As the economy toughens worldwide, food security is a major concern for people living in urban and rural areas. Many turn to raised vegetable garden layouts to maximize spaces and yields and reduce grocery expenses.
The result? Increased demand for premade garden layouts to help novice gardeners supplement their food supply. So, if you are wondering how to position yourself to benefit from this trend, you’re in the right place.
Read on for an overview of this market and a rundown of the top beginner-friendly raised garden layouts for 2024.
Table of Contents
Global market size for raised vegetable garden beds
Beginner friendly-raised vegetable garden layouts
The bottom line
Global market size for raised vegetable garden beds
The global market size for raised garden beds is projected to grow at a compound annual growth rate (CAGR) of 3.5%, rising from US$ 435.8 million in 2022 to US$ 544.9 million in 2029. According to Google Ad data, 22000 people searched “cheap raised garden beds” in April, a 6% increase from the previous month. This data shows that raised garden beds are profitable.
The following factors propel this market growth:
- Urbanization reduces traditional gardening spaces, and raised beds provide the perfect solution.
- Raised vegetable gardens are accessible to a broader demographic.
- Raised beds are built to specific sizes and shapes, catering to various preferences and gardening needs.
- They give gardeners more control over the soil quality, drainage, and composition, leading to healthier plants and increased yields.
- Increased awareness about sustainable living, organic food, and the desire for healthy eating have prompted more people to explore gardening options like raised beds.
However, not all raised vegetable garden layouts are suitable for beginners. Here are some designs that the novice will love.
Beginner friendly-raised vegetable garden layouts
Most inexperienced gardeners want easy-to-implement layouts with the right raised garden beds. Here are some you can recommend to your customers.
1. Vertical wonderland: The hanging gardens
Gardening spaces are limited in urban centers, making a horizontal garden layout challenging. However, embracing vertical space introduces a new dimension to gardening.
Hanging gardens save space since one plants veggies on top of the other. They’re perfect for balconies, patios, or limited outdoor areas. Suspended containers or vertical planters create a green tapestry that beautifies a home and provides high yields.
Besides space maximization and enhanced aesthetics, a vertical garden layout allows better air circulation, reducing the risk of pests and diseases.
How to do it:
- Choose a sturdy frame. A wire plant stand is an excellent option, but one can choose the good old-fashioned timber ladder or timber pallet. Ensure the frame you choose is strong.
- Choose appropriate containers or pots with proper drainage holes. While most premade vertical systems have small pots for small plants, they can limit the growth of some plants. It’s good to choose various pot sizes, like a plastic bucket or a lightweight wire basket lined with coconut fiber.
- Choose suitable plants or seeds. This is where creativity comes into play. One should combine different crops with cohesive colors, textures, and forms. It is essential to decide on a theme since it determines where to put a vertical garden.
- Choose between 3-5 core vegetables with different textures. For a simple edible garden, try spring onion as a strappy plant, rosemary as a training plant, and parsley as a bushy plant.
- Set it out. If one buys two garden ladders, use a garden wire to secure them together so they don’t topple over. Play with pot placement before hanging them up. Set the plants in pots to establish where they best fit. Stagger the pots to ensure airflow.
- Pot up the plants. Use a well-draining premium potting mix rich in organic matter. Ensure the plants or seeds are placed apart on the raised bed to avoid overcrowding.
Of course, plants will also need regular maintenance, like watering and trimming.
2. Circular symphony: Spiral herb garden
This raised garden bed design is perfect for beginners since it allows easy reach for tending and harvesting vegetables. Combining it with other layouts makes it an attractive focal point in one’s garden.
How to build a spiral garden:
- Draw out the desired spiral design on a piece of paper. This helps determine the size, visualization, material estimation, planning, and organizing.
- Choose the location. Pick a spot with adequate sunlight and access to water, especially near the home. One can also create this layout at the center of the garden.
- Make the spiral shape. Using a string, hose, or rope, outline the spiral shape at the designated location. The standard size is often 3.5 feet from the center.
- Start building up the shape. Once the spiral is marked, place a layer of bricks or stones on that spiral. Work inward, adding vertical layers until one achieves the desired height. If one is building upward spirals, one should place one up for every two flat bricks.
- Fill the shape and get it plant ready. Once the gardener is built 360 degrees of the first level, one can add mulch, soil, and compost to enhance the plant’s nitrogen fix.
3. Patchwork paradise: Quilted garden bed
The quilted garden bed concept is another raised bed layout for beginners to design outstanding gardens. It is inspired by patchwork quilts- blending different plants including tomatoes and kales artistically and functionally.
Anyone who wants to improve their garden’s visual appeal while maximizing space can benefit from this design. One can plant vegetables, flowers, and herbs in the same garden, thus encouraging symbiotic relationships between plants.
Like a fabric cloth, a quilted garden bed is all about color, texture, and patterns. Beginners could select a simple pattern of squares and triangles. Alternatively, one use several readymade compartment garden beds to build the garden.
How to do it:
- Draw the pattern. Sketch a layout or pattern on graph paper, considering the size and types of crop one wants to incorporate. The sketch will show where to plant different flowers and vegetables.
- Prepare the bed. Clear the area designated for the bed and prepare the soil by amending it with compost or organic matter. This helps ensure the plants grow healthy and radiant.
- Select suitable plants. Choose different plants with unique textures and colors. Ensure they complement each other in growth habits, sunlight needs, and mutual benefits.
- Plant the vegetables. Arrange the plants according to the planned layout, ensuring proper spacing and considering their growth patterns. Use sticks and strings to mark the pattern in the garden. Include plants with colorful foliage to maintain the design’s beauty.
- Maintenance. Regularly monitor and maintain the design with regular deadheading and trimming to keep those wayward plants inbound. Trimming scissors are excellent tools to help with this process.
4. Symmetrical harmony: Mandalas in your garden
Anyone who loves gardening and art will fall for the beautiful Mandalas technique. A mandala garden is designed in a circular form and is popular because of the rise of container gardening in urban centers.
It allows one to efficiently utilize small spaces, grow more plants in the same area, and increase yields in any growing season. It’s easy to maintain with limited resources and time. Furthermore, it promotes biodiversity in plants through companion planting, allowing pollinators to flourish for the benefit of the garden.
While experienced farmers may prefer complex designs, beginners may be comfortable with a single or double-ring structure. The mandala’s symmetrical and versatile pattern suits different aesthetic preferences, enabling one to choose a pattern that’s ideal to their garden. With colorful crops and fruits like tomatoes, you can create a garden that is the talk of town.
How to do it:
- Choose a suitable spot. Choose the best location for the mandala garden. The spot should have direct sunlight and wind access and a better drainage system. The place should also be spacious to handle different vegetables and herbs.
- Draw your design. Drawing the design on paper helps to visualize the garden and make necessary changes before the work starts. The next step is creating a circle using a rope and string to mark the garden’s location.
- Build and plant the garden. Hedge the soil using bamboo, plastic, bricks, corrugated iron sheets, or timber. Fill the garden spaces with the same soil mix and organic compost for uniform growth. Once the garden is ready, start planting.
Combine plants with different colors, textures, and heights to ensure they complement each other. This approach will enhance the garden’s aesthetic appeal. Remember, one can diversify different plants in a single design for a better layout.
5. Zigzag or pathway beauty
The zigzag or pathway garden is a clever and efficient design that combines raised bed gardening with a convenient layout for easy access and maintenance. The pathway lines help the gardener and visitors quickly move through the garden.
This pattern is simple and easy to design. Since they are space-saving, they are ideal for backyards, residential, rooftop, urban, or school gardens. Besides maximizing the planting area, this design combines different plants to create visually appealing garden layouts.
This design allows beginners to build a raised vegetable garden in unconventional spaces. One can turn a pathway from the gate to the house into a magnificent garden that wows guests. Imagine a procession filled with parsley, rosemary, tomatoes, and kales!
Constructing a zigzag raised bed requires sturdy materials like stones, lumber, or bricks. One will also need high-quality soil mixed with compost to fill the raised beds and provide a nutrient for vegetables and herbs. And, of course, materials such as gravel, woodchips, and stepping stones are essential when creating pathways around and between the raised beds.
How to do it:
- Plan the layout. Using ground markers, sketch the design, considering the desired shape and size of the raised beds and pathways. One should establish where to place the central composting basket or keyhole.
- Build the bed. Use the chosen materials to construct the zigzag raised beds, ensuring they have appropriate width and height for plant growth and easy access.
- Prepare the soil. Fill the raised bed with soil mix for proper plant growth. One can make this mix or buy it from the store.
- Build a central composting basket. Since we’re discussing the keyhole design, build a central basket with wire mesh or slats for composting and water distribution to surrounding plants.
- Plant the seeds. Choose suitable crops for the zigzag layout. Before choosing a plant, consider its sunlight requirements and how you intend to arrange them within the beds. Companion planting also works well with this design.
- Construct pathways. Create pathways around and between the raised beds and lay them using gravel, woodchips, and stepping stones. Pathways enhance easy access for maintenance and harvesting.
6. Layered treasure: Three-dimensional hügelkultur garden
The German word Hugelkultur (hoogle-culture) means a raised garden bed made from rotted wood. This method involves making permaculture using organic matter that provides soil nutrients to the plants.
The Hugelkultur bed offers increased garden space, allowing one to plant on the top and sideways. The wooden bed also acts as a sponge that absorbs water, and the top mulch layer prevents evaporation, thus resulting in less watering.
How to do it:
- Dig out a few feet of sod. While this involves hard labor, it’s a vital step for readying the bed for planting. Step 5 compounds what’s involved in this step. Add fallen or cut down large decaying logs, especially those that have been stayed down for 2-3 years.
- Pour composted wood chips. Composted wood chips fill the air spaces between logs. They add valuable nutrients and help absorb moisture before the logs and branches decay.
- Add light wooden materials and branches. This step allows one to utilize the small branches from the chopped tree and help establish the structure of the raised bed.
- Add nutrient-rich matter. At this stage, one adds back the sod they had dug to the bed. You can lay them upside down to prevent the grass from growing through the materials. The grass and root on the sod will provide 0.3 feet of nitrogen-rich topsoil. One can also add a few rotting hay to increase nutrients.
- Add soil mix and compost. This step is valuable for providing a thicker year-one planting. A thicker layer means versatility for planting various plants quickly. Besides planting seedlings, one can plant vegetable seeds directly on the raised bed.
7. Modular elegance: Container stack gardens
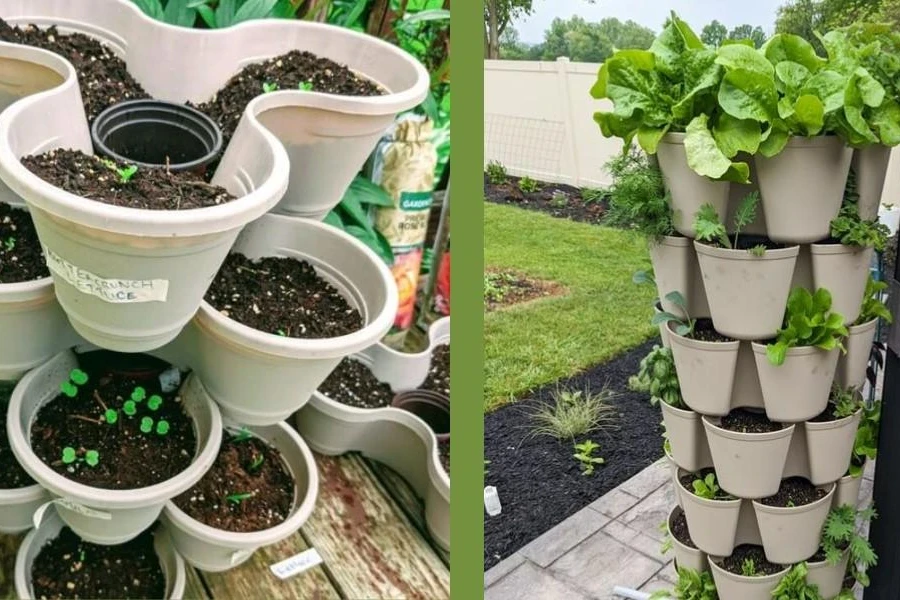
The container stack garden layout is versatile and easy to create for beginners. With this technique, one can design a raised vegetable garden that suits any space, whether a small balcony or a sprawling backyard. It involves stacking containers of varying sizes and materials to create a multi-tiered garden.
They are portable and can easily be rearranged to allow sunlight exposure. And since one can mix and match containers of different sizes, shapes, and materials, they help create a personalized garden.
How to do it:
- Select Containers. Choose various containers such as pots, planters, or bins in different sizes and materials. Variety adds to the garden’s aesthetic appeal.
- Arrange Containers. Stack the containers strategically, considering the garden space and sunlight requirements for the plants.
- Prepare Soil and Drainage. Ensure each container has proper drainage holes and fill them with nutrient-rich soil. Some prefer self-watering stackable containers and soil mix to prevent water logging.
- Plant Selection. Select plants that thrive in containers and suit the available space and sunlight conditions. One can also plant vegetables seeds directly in the soil mix.
Tip for retailers: Most gardeners lack the skills and time to build container stack gardens. They would instead buy ready-made containers to create their raised bed garden. If you stock these stacked containers, you can reap from their high demand.
The bottom line
As people have become aware of the value of fresh organic vegetables, the demand for raised vegetable garden beds has also risen. These garden layouts are indispensable solutions for urban and rural dwellers seeking cost-efficient sustenance.
The burgeoning demand for premade garden layouts points to a lucrative niche for retailers. These beginner-friendly raised garden beds are ideal for novice and experienced gardeners looking for a simple way to turn their backyard into a beautiful farm.
Retailers can position themselves as gardening authorities and leverage the market surge by stocking ready-made solutions that embrace these seven layouts. For more, you can explore a range of raised vegetable garden beds on Alibaba.com.